Monday, December 10, 2018

How to Shibori a scarf December 1, 2018


What a great way to start December 2018!! We had a class at Cary Quilting Company on “How to Shibori a scarf.”


Aoife , Debbie, and Jeanette joined me and learned how to stich and fold a resist into a scarf and then dye it.


We used small rubber bands to create a Vertical Fold
To do this, you want to dampen your silk, then scrunch it in small folds to the end then attach rubber bands at the ends and or middle. (the white lines is where the bands prevented color from getting into the silk)
 
 
and we did a design using a straight line and a starburst
 
We chatted .....
   and we stitched....
 

 and we chatted.....
 
and we Dyed


It was amazing how fast three hours can fly! By the time we were done each had a Vertical Fold ready to be washed at home and a new Starburst curing in the dye ready to be washed out.
Below are the results of the class. I think they are all beautiful!!!!
 
Below are Aoife's


Here are Debbie's
 
 
And here are Jeanette's
 
 
They all turned out beautiful!!
 
 
I am conducting another Shibori Class at Cary Quilting company on Saturday March 2, from 9:30 AM to 4:30 PM.  The cost is $108 and we'll be stitching on cotton panels to make that lovely "one of a kind"  panel.
If you are interested just follow the link and sign up. We'll get busy sewing, then break for lunch and start to dye your creations. Hope to see you there!!


Sunday, July 1, 2018

Gelli Play Demo at Cary Quilting Company

It was a lovely day Saturday June 23, 2018!!
It was a balmy 90+ degrees outside and I was happily playing inside Cary Quilting Company's brand new workshop playing with Marabu Textil paints, Gelli plates, and pre-treated squares of muslin.

Ann Young came and joined me and she quite enjoyed herself learning how to use the gelli plates

You put the paint on the gelli, spread it around with a brayer

make sure your paint is somewhat even

put the netting on the plate and rub, rub, rub and viola!!!
You have a really cool piece of fabric that can be cut up or used as a base. 


This is how we did on our day in Gelli Land. Stay tuned for a more step by step posting!!

Wednesday, June 13, 2018

Teaching again at Cary Quilting Company!!

I am so excited to be teaching again!! Cary Quilting Company now has an AWESOME Meeting Center/classroom. It is a wonderful place to teach in. (They are also looking to rent it out, reasonable rates as well)


On Saturday June 9, I led a Dying 101 class to introduce beginning dying to those who want to learn. I put it together as a class I wish I could have found when I was wanting to learn years ago.


I had six people sign up and we covered the basics of mixing a chem water to use for Procian Fiber Reactive Dyes and everyone had a hand at mixing at least one bottle of dye.


Then came the fun part...dying!
We used "White on White" fabric since it looks so cool after it's dyed in class. Below you can see some examples. We first dyed using a cookie sheet do keep out any variations.(folds)


Then we started to smoosh everything into a jar and add colors as it was smooshed.


We also used plastic quart bags and plastic mushroom containers to dye in. I did have to warn them that once they started to dye....they will never walk through a hardware or grocery store the same way again!
We ended up dying seven yards of fabric and I think everyone had a good time!!


Coming Saturday June 23, Gelli Play! Using a 6x6 Gelli plate and Marabu textile paints!!!


CMMAG Play Day at Sharon's


I belong to the Carolina Mixed Media Artist Guild. Every year we have a play day at a member’s studio and have round robin demonstrations of a technique and then bring enough supplies to let the other members try it out.
This year scarves were requested. I was trying to find a technique that would be fast, different and unique. I was scanning through Facebook and saw a video of an elementary class applying color via bubbles….. They mixed paint to the bubble solution, cut plastic bottles in half, attached netting to the base and dabbed the applicator into the solution then “blew” bubbles through the bottle top and the bubbles landed on the paper…
Of course I found inspiration.
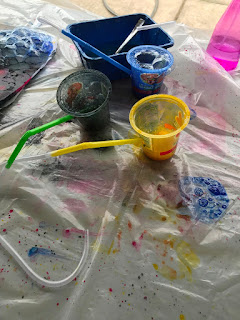
I tried to do it the same in the video but it didn’t come out at all the same….so I took a different approach…thinking of the old bubble piles I had as a kid, I created the below applicator and it worked GREAT!!!


My fellow Guildies found it amusing as well


.

But the color went on very random (which I love) and the colors blended very well. I used Marabu Silk paint and it worked beautifully. It has water like consistency so it blended well with the bubbles.


And then the bubbles began!!


Me trying not to breathe in the bubbles by accident
Then we add blue


And then the red

Then it went out to dry


Others tried it and everyone seemed to have a great time playing with it!!


The scarves turned out pretty nice!


all in all it was a successful Play Day!!!