I've been busy busy getting scarves dyed (more on those later) and getting wall hangings ready for the North Carolina Quilt Symposium in Fayetville, North Carolina May 23 - 26. I made it easy on myself and I only had to create one from scratch, the other two were projects I had done previously.
"Dragonfly" is the result of a Thread Sketching class I took with Susan Brubaker Knapp http://www.bluemoonriver.com/ at the 2011 NC Quilt Symposium. Susan taught a great class and instead of letting my dragonfly become a UFO (Un-Finished Object) I Appliqued some leaves and branches with left over batiks and I dug up a fairy scrap and per her on as well. I like Susan's class so much I'm signed up to take her "Painting on Broadcloth" class at this year's NC Symposium.
"Asharah" is a wall hanging I made last fall. She was my depiction of water. I had used different values of blue to try and emulate the flow of water and since Asharah was a Goddess, I gave her some funky hair and jewels. I quilted in different shapes of birds, plants and people. I like how it turned out.
"Finally Finished" is a challenge quilt I finally finished. My sister Anne had given Dawn and myself a panel to do something with. I am sad to say that I didn't get mine done in time to show at Symposium last year. However I did finally get it done this year. I didn't know what to do, especially after seeing Anne's and Dawn's. (see just below)
 |
| Anne's Quilt |
 |
| Dawn's Quilt |
I started to doodle...
.........and I came up with a sketch.
I really liked the sketch and and it was definitely different than Anne and Dawn.
I decided to use a technique I learned with Katie Pasquini Masopust http://www.katiepm.com/ when she taught a workshop at Capital Quilt Guild.
Ghost Layers and Color Washes.
I decided to just look at the value side of things and leave out the Ghost Layers.
You can't see if from here however I decided to use use the white background in the panel be my starting point and chose a light and medium dark value to the cream. Then when I finished making my pattern I marked up the values and colors on the pattern.(you can't see it in this picture) and glued it to white poster board.

Once the glue is dry you can cut your pieces out and you now have a template to cut your pieces out and you can fold them over and get a really nice edge. (well, KMP can, I still need major practice!)
After you cut your pattern piece out. You want to lay it print side down on the back side of the fabric.
Then, I (using a ruler as a guide) traced out the pattern, measuring out roughly .25 of an inch around your template using a pen or pencil. I used a wonderful pen that you can mark fabric up with and the ink disappears when it's subjected to heat.
After I got the pattern drawn, and cut out. I then ironed the seams back so form the shape of the template. I was really glad I had one of these small handy dandy irons to press...my fingers would have been literally fried with a large iron.
When you get done ironing you piece as you can see the seams hold their own and then you match it to the pattern you've copied on to some Sulky Heat Away Stabilizer.
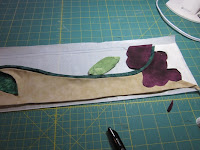
Then you do the same thing with the rest of your pieces. Cut the pattern piece out, trace it, cut it, shape it.
and then match it.
When you get all the pieces matched, then iron it down, small dabs of Elmers Glue works if some spots aren't cooperating. then you take clear thread and sew down every seam.
I'm sorry to say I didn't any other pictures in the construction than these. Believe me when I say I was in a hurry to get this finished...
I am happy with the results and I think it turned out pretty close to my original sketch and the final outcome.


No comments:
Post a Comment